You went to take a picture with your iPhone SE, but ran into an issue: your iPhone's camera is acting weird. From capturing memories to scanning QR codes, the camera is an essential component to the iPhone. Today, I'll show you what to do if your iPhone SE camera is not working!
Why Isn't Your iPhone SE Camera Working?
If your iPhone SE's camera isn't working, the first thing to do is to determine whether the issue is caused by a hardware or software problem. Like many other iPhone features, the camera can often malfunction as the result of a software bug. Luckily, many software malfunctions are minor and easy to fix from home.
It's also possible that the reason your camera is not working is due to a hardware problem. In the following steps, we'll help you determine exactly what's causing your camera to malfunction, and show you how to fix it!
Remove Your Phone Case
One of the simplest explanations for why an iPhone camera isn't working is that its phone case is blocking the lens. You'd be surprised how easy it to attach an iPhone case upside-down!
Double-check that your phone case is on correctly and that it's not covering the camera. If it's not your case causing the trouble, keep reading to find out why your iPhone SE's camera isn't working properly.
Watch Out For Third-Party Apps
Often, the reason your camera isn't working is because you're using a third-party application, and not the native iOS Camera app. Camera apps made by third-parties — especially those made by smaller app developers — are especially prone to crashes. This could be the reason your camera isn't working
The easiest way to test for this is to try using your iPhone's built-in camera app. If you can take pictures and videos normally from there, you can be sure that the other app you were using was causing the problem!
If you're not using a third-party camera app, then follow the steps below to figure out exactly what's happening to your iPhone SE's camera.
Restart Your Phone
If your iPhone is currently experiencing a software glitch, restarting your device might be the only fix you need. To do this on an iPhone SE, hold down the Lock button on the side of the phone and wait for the Slide To Power Off display to appear on your screen.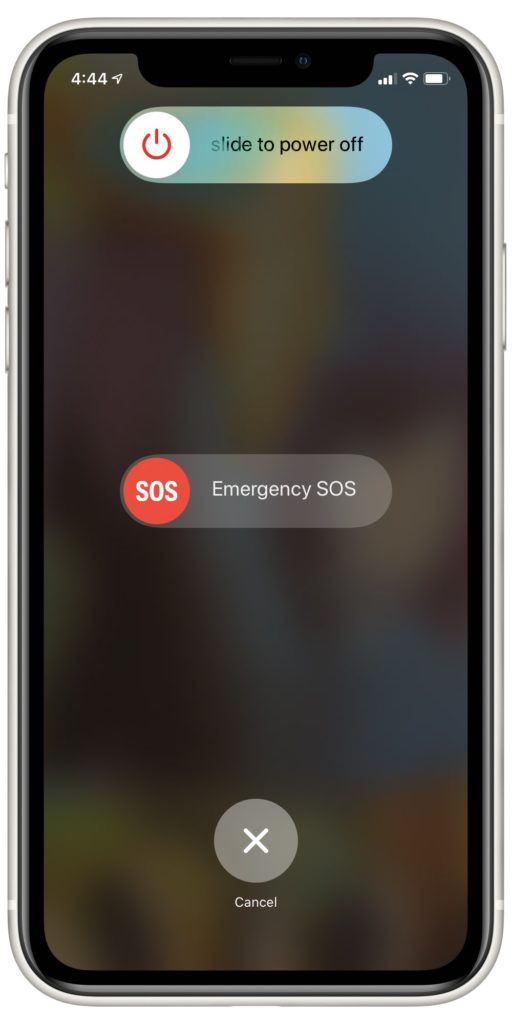 Once the slider appears, drag it across the screen and wait thirty seconds to ensure that your phone is entirely off. After this, press and hold the Lock button again until the Apple logo appears on your screen. Once you see the Apple logo, it should only be a few moments before your iPhone is working normally again.
Close Your Apps
If restarting your phone doesn't fix your camera issue, there are a few more steps you can take to troubleshoot the software. The next thing we recommend is to close out of every app on your phone. By leaving apps open in the background, your phone is more likely to crash because too many things are running and using battery life.
It's also possible that a crashed app is interfering with your iPhone's processing. This could explain why your camera is malfunctioning. Closing all the apps on your phone will help eliminate any problematic software bugs.
To close apps on the iPhone SE, double tap the Home button. Doing this will open the App Switcher, which displays all of your open applications horizontally. Once the App Switcher is open, just swipe each of your apps up and off the screen to close them!
Update iOS On Your iPhone SE
Apple frequently releases software updates for improvements, new features, and bug fixes. It's possible the issue you're experiencing is happening to other iPhone users as well. If that's the case, Apple might even include a fix specifically designed for this malfunction in an iOS update!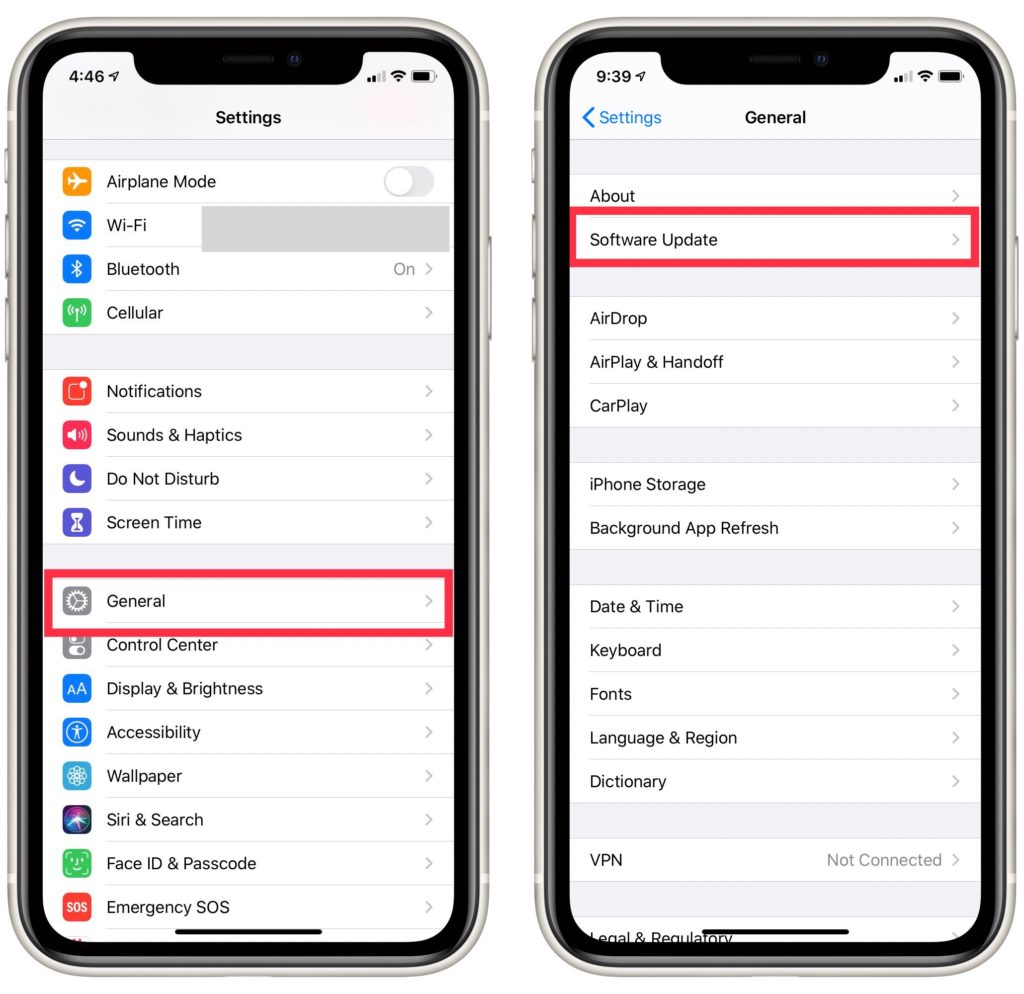
To make sure you have the latest software installed, open Settings and select General. From there, tap Software Update.
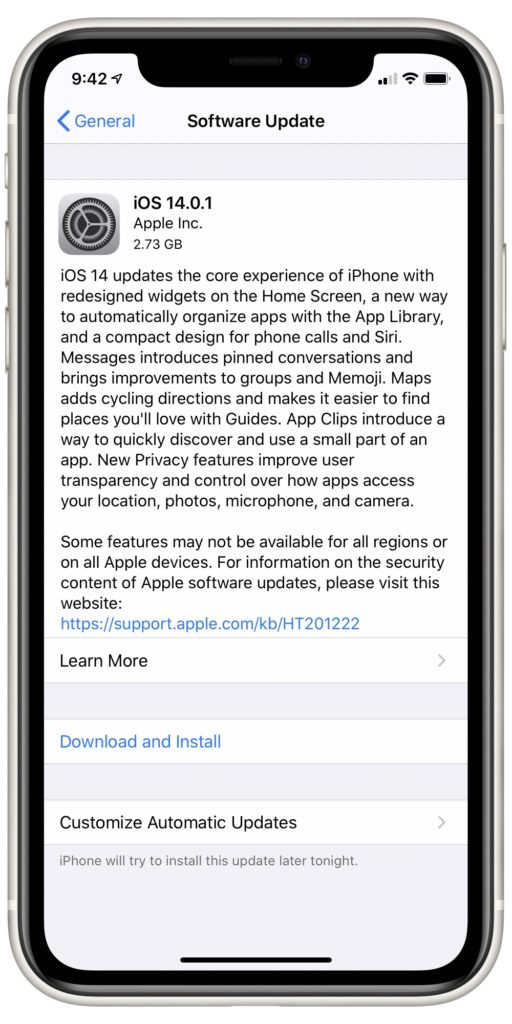
If there's a new update available, tap Download and Install. This page also gives you the option to enable Automatic Updates. If you don't want to keep manually updating your iPhone every time a new iOS comes out, turn this setting on and your iPhone will start updating automatically.
Reset All Settings
If troubles with your iPhone SE's camera still persist, this step can help rid your phone of several bugs that you might be experiencing. This action restores every setting in your phone to their defaults, and it's a great catch-all fix for bugs that are hard to track down.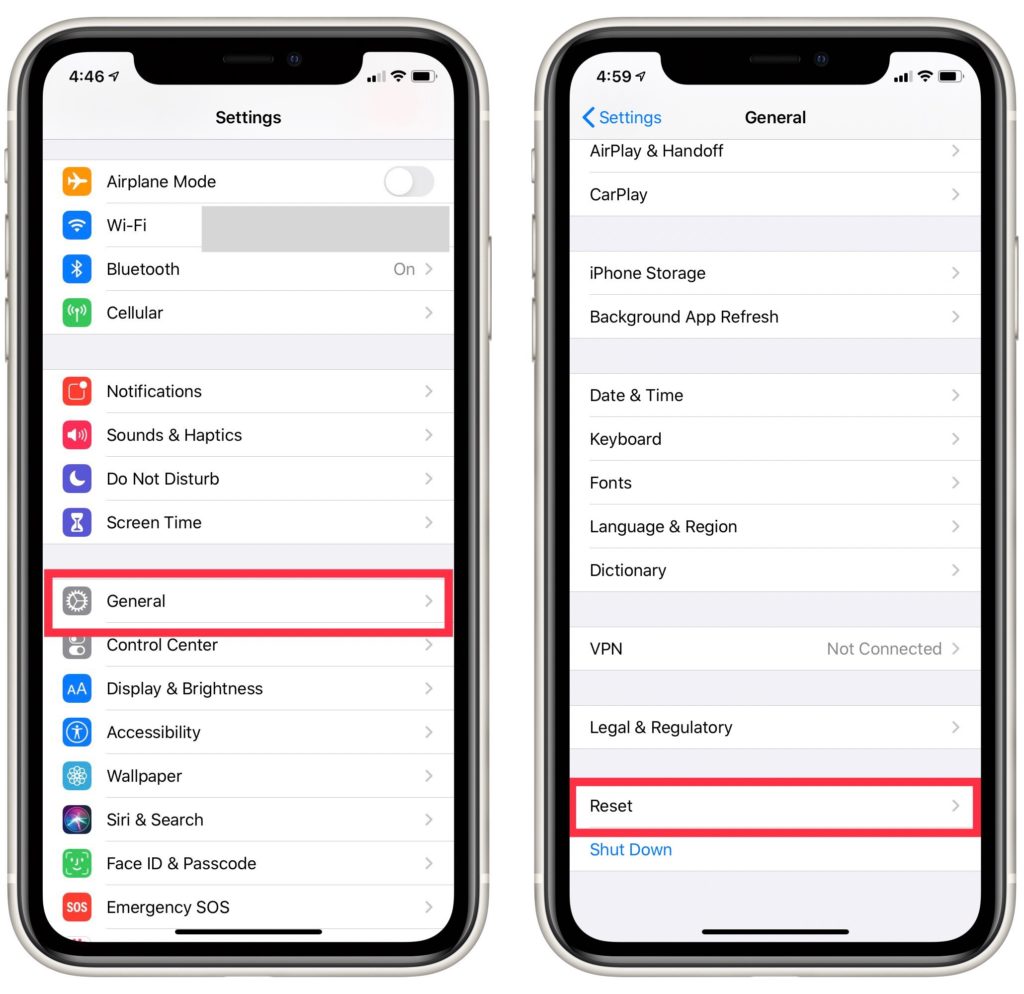
Open Settings and tap General. Then, scroll down and tap Reset at the bottom of the page. Then, select Reset All Settings at the top of the screen. 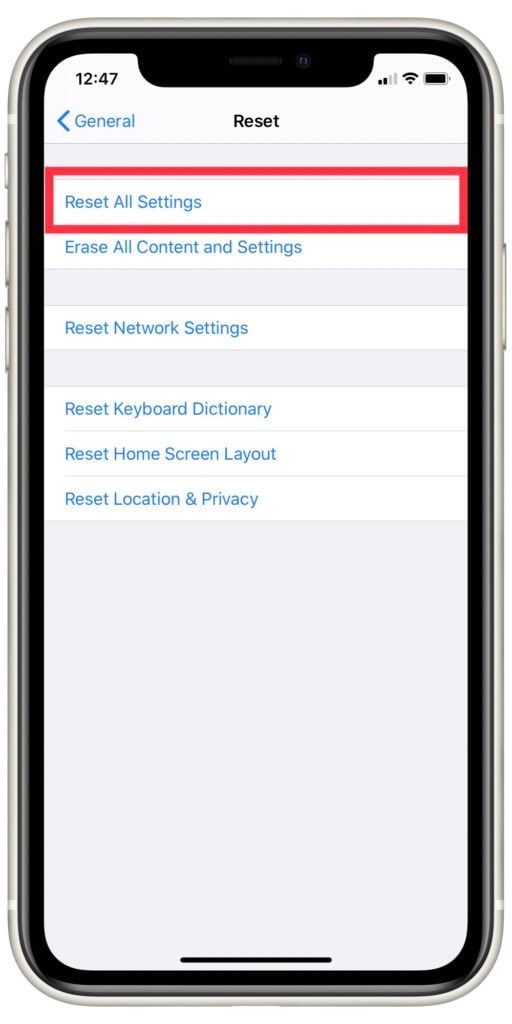 Your iPhone will then request your passcode, before asking if you'd like to proceed. When prompted, tap Reset All Settings to begin the reset process.
A progress bar will appear on your iPhone's screen. You'll know the reset is finished when your phone turns back on.
Back Up Your iPhone
If your iPhone SE's camera still isn't working, we recommend backing up your iPhone to protect any data you have stored on it. It's possible that fixing your iPhone's camera will require some pretty drastic repair efforts. Saving a backup now will ensure that none of your important information gets lost in the process.
There are three ways that you can backup your iPhone: iCloud, iTunes, and Finder.
Backing Up Your Phone With iCloud
With iCloud, you only need your iPhone and a Wi-Fi connection to backup your information. To begin, open Settings, select your name at the top of the screen, then tap iCloud. Next, tap iCloud Backup and make sure the switch labelled iCloud Backup is flipped on.
Underneath the switch, tap Back Up Now to begin the backup. When a progress bar appears on your screen you'll know the backup is underway. When the backup it complete, the bar will disappear.
Backing Up Your iPhone With iTunes
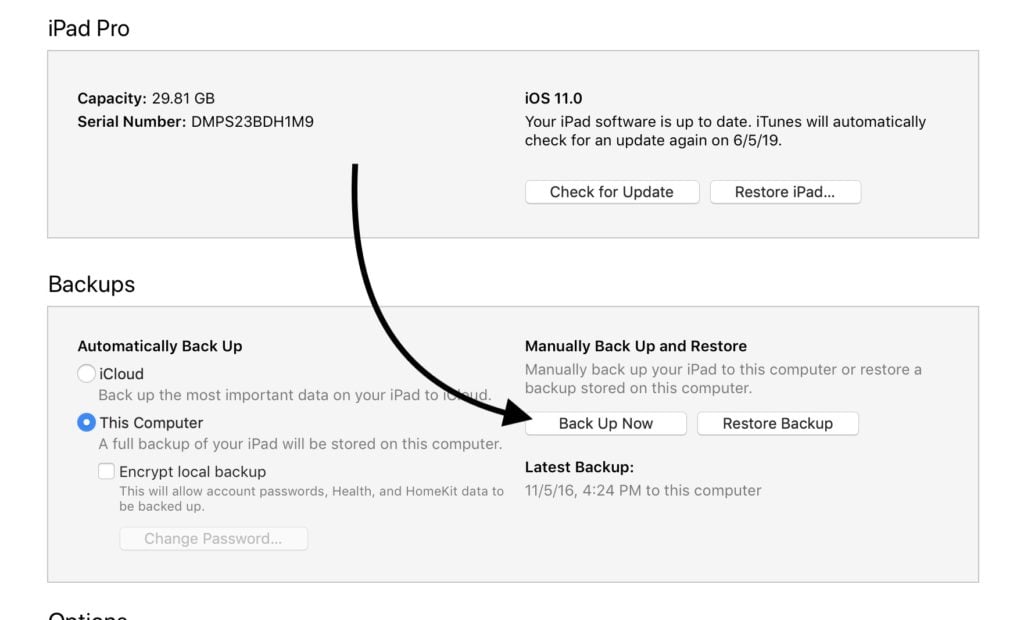
If you have a Windows computer or a Mac running MacOS 10.14 or earlier, you can also back up your iPhone to iTunes. First, plug your iPhone into your computer with a Lightning cable, then open iTunes on your computer and select the iPhone icon in the upper left corner of the screen.
From there, you can either click the circle next to iCloud or This Computer to indicate where you want to store your data. Next, click Back Up Now. Once the backup is finished, you'll see the current date and time appear under Latest Backup.
Backing Up Your iPhone With Finder
Finder has replaced iTunes on Apple computers operating with Catalina 10.15 or newer. The backup process with Finder is almost identical to how you'd do it on iTunes.
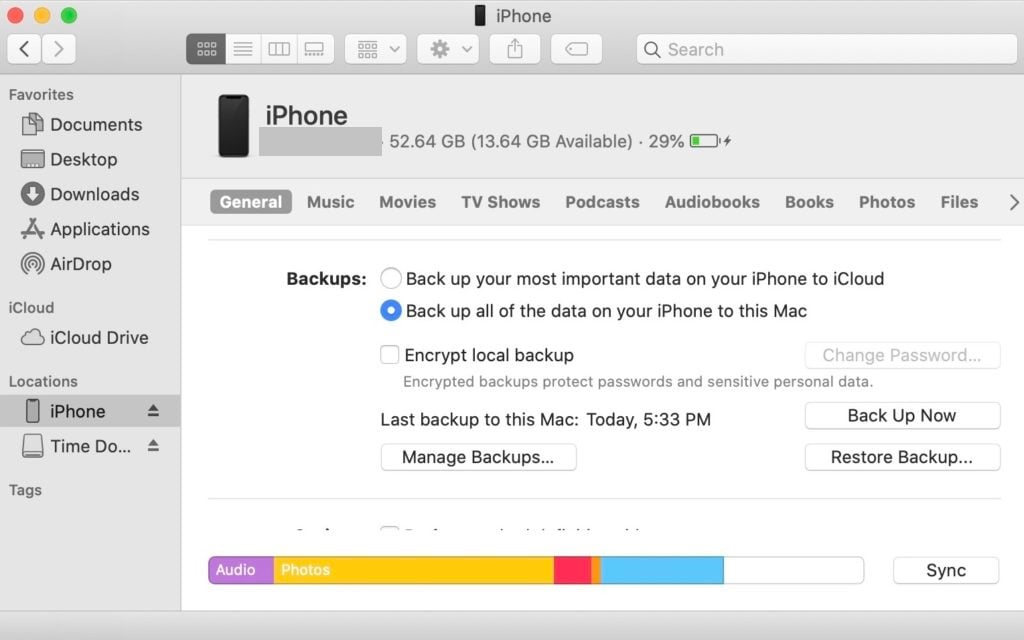
First, plug your iPhone into your computer. After connecting your iPhone and Mac, open Finder. Then, locate and select your phone from the Locations tab.
Click the circle next to Back Up All Of The Data On Your iPhone To This Mac. Then, select Back Up Now and the backup will begin. Just like with the iTunes backup, you'll see the current date and time next to Latest Backup after the backup finishes.
Put Your Phone In DFU Mode
Now that your information is safely backed up, we suggest putting your iPhone in DFU mode and restoring it. A DFU restore will erase all of your data and settings from your iPhone, reverting it to its factory defaults. This is the last step we recommend for troubleshooting software issues. If your camera still doesn't work after putting your iPhone in DFU mode, faulty hardware is most likely causing the problem.
To perform a DFU restore, You'll need a computer with iTunes or Finder, as well as a Lightning cable. Connect your iPhone to your computer and open iTunes or Finder. Begin by holding down both the Home button and Lock button for eight seconds. After these eight seconds, release only the Lock button. If the Apple logo appears on your screen, that means the Lock button was held for too long and you'll need to start over.
Nothing will appear on your screen to indicate that you're in DFU mode, but your phone will appear in iTunes or Finder as a device in recovery mode. When your iPhone is successfully in DFU mode, just click Restore and select the backup you just saved!
Repair Your iPhone With Apple
If you've followed the steps above and your iPhone SE's camera still isn't working, then a hardware issue is what's most likely causing the problem. Hardware problems are complex, and we don't recommend trying to fix them on your own.
We suggest contacting Apple Support to find out what your repair options are. You can reach out to them online, or in person at the Apple Store! Either way, you'll be able to speak with a licensed Apple technician and have your iPhone officially diagnosed!
Upgrade To A New Phone
Apple's repair servicing can get pretty pricey. Since the iPhone SE is an older phone anyway, it might be worth using that money toward a new phone altogether. If this sounds like something you're interested in, check out our phone comparison tool to help you choose the right phone for you and your budget.
Picture This: A Working Camera!
Now, we hope you know exactly what do to get your iPhone's camera working again! You no longer have to worry about your iPhone SE's camera not working, and you can enjoy using it to the fullest. We hope this article was helpful to you, feel free to leave any questions or suggestions you have below! Thanks for reading!
